
Located 31km south of the townsite of Jasper Alberta, down Highway 93 to the junction of Hwy 93 and Hwy 93a. First thing Ill do is tell you a little about Athabasca Falls – IT IS A Class 5 waterfall with a drop of 24m (80 feet). Athabasca Falls is considered the most powerful waterfalls in the Canadian Rockies and thus are extremely popular and busy especially on weekends. A mainly paved trail takes you along so you can view the power of these amazing waterfalls, please don’t go beyond the railing as the rocks are very slippery and treacherous. The path leads you to many great viewpoints of the falls with the famous Mount Kerkeslin (2084m) in the background, so no need to wonder of the trail. I suggest visiting these in the evening as most groups and tours don’t operate during this time period.
Distance: 1.79 km (return)
Elevation: 20m
Distance: 14.51km (return)
Elevation Gain: 676m
Directions to trailhead
From the traffic lights, drive west on Connaught Drive for two blocks. Turn right onto Pine Avenue. At the end of Pine Avenue, turn left onto Bonhomme Street. Follow this road for 650 metres before taking the gravel road on your right to the trailhead marked
Distance: 23.8km return
Elevation Gain: 549m
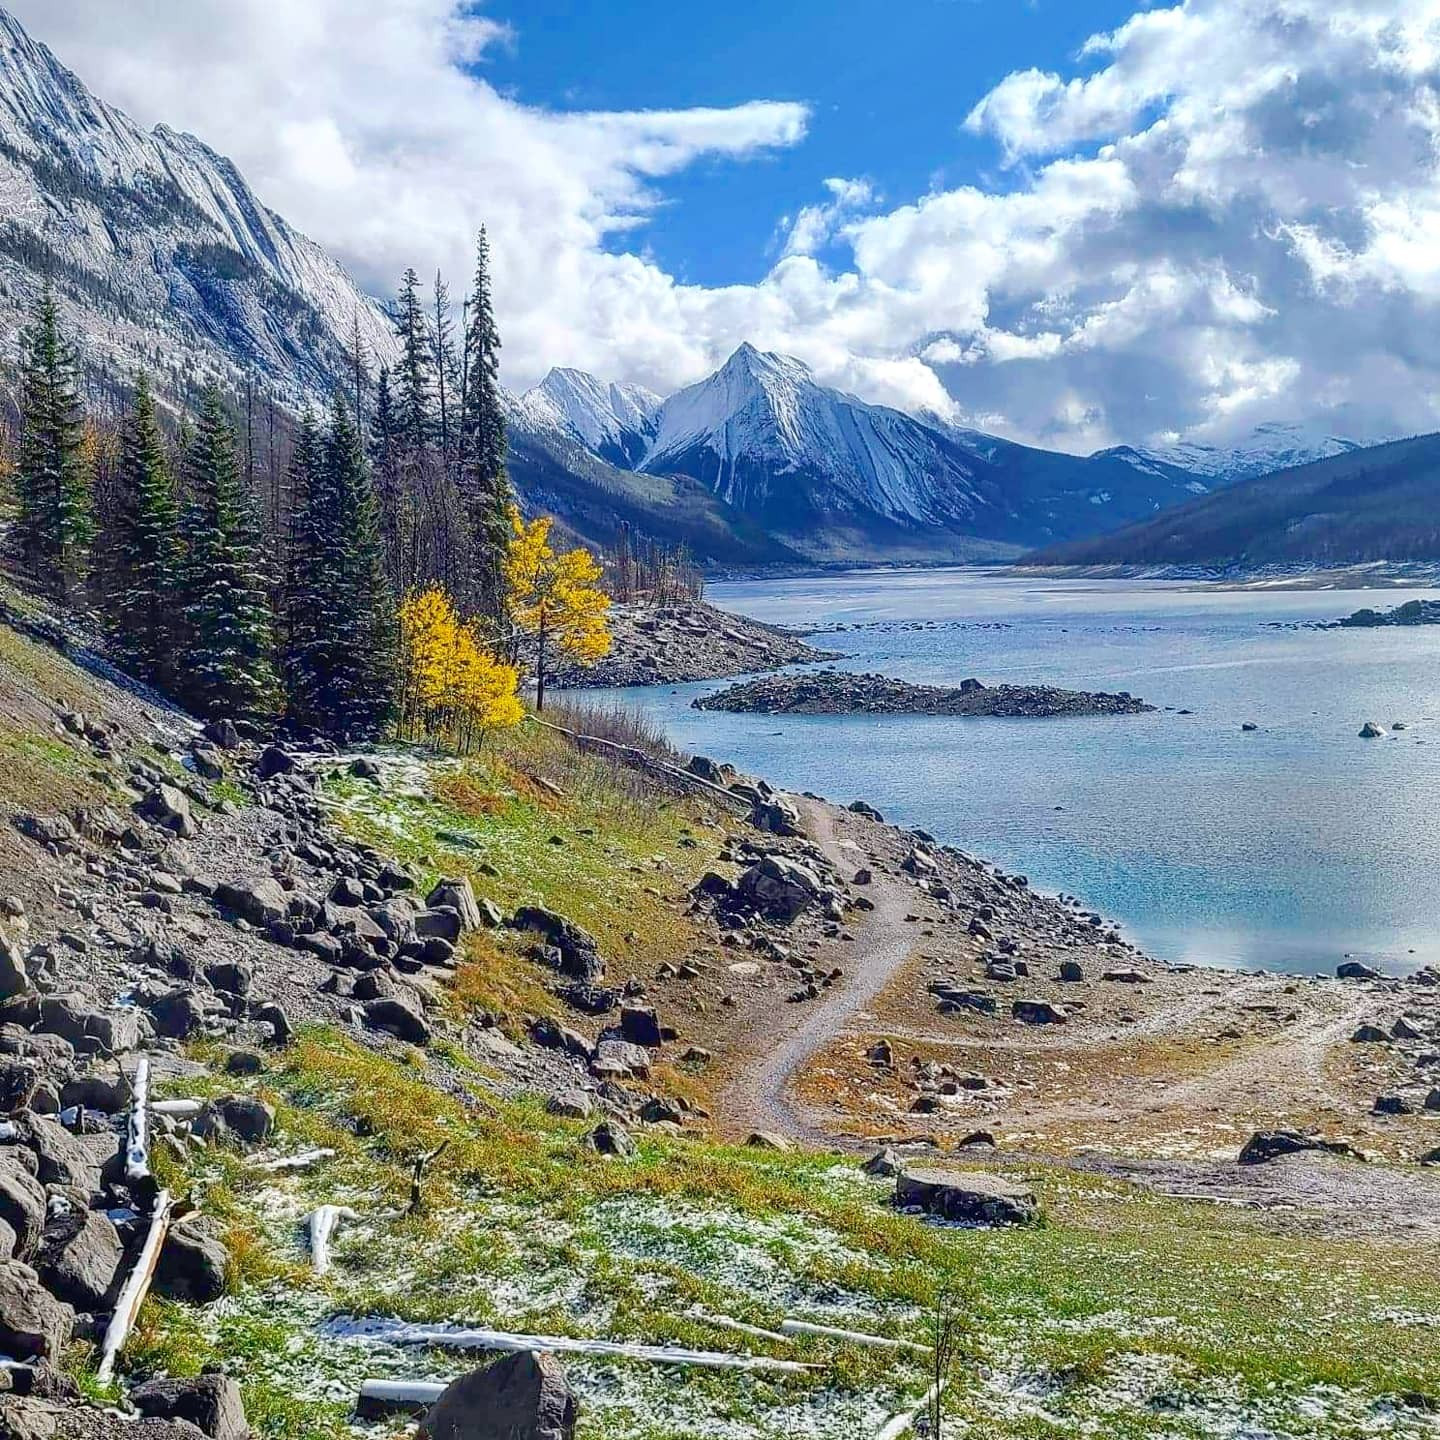
Turn north off of Highway 16 on to a dirt road, roughly 9.65km west of Jasper, just west of the bridge over Meadow Creek. This is the parking lot for the trailhead. From the parking lot, follow the trail to your first junction, turn right here and cross the train tracks. Once across the tracks your next point of interest is where you cross the Miette Rive on a safe reliable bridge. From here the trail ascends through the forest until you drop down to Minaga Creek, and then continues a gentle ascent. Shortly after this you come to a junction. To stay on this trail, go right here, after a short time a trail appears on your right – this leads to Viryl Lake (I have included this profile below as I highly recommend visiting if you have time). Dorothy Lake is approximately 600km farter along the trail. You can return the same way.
Distance: 8.31km (return)
Elevation: 266m
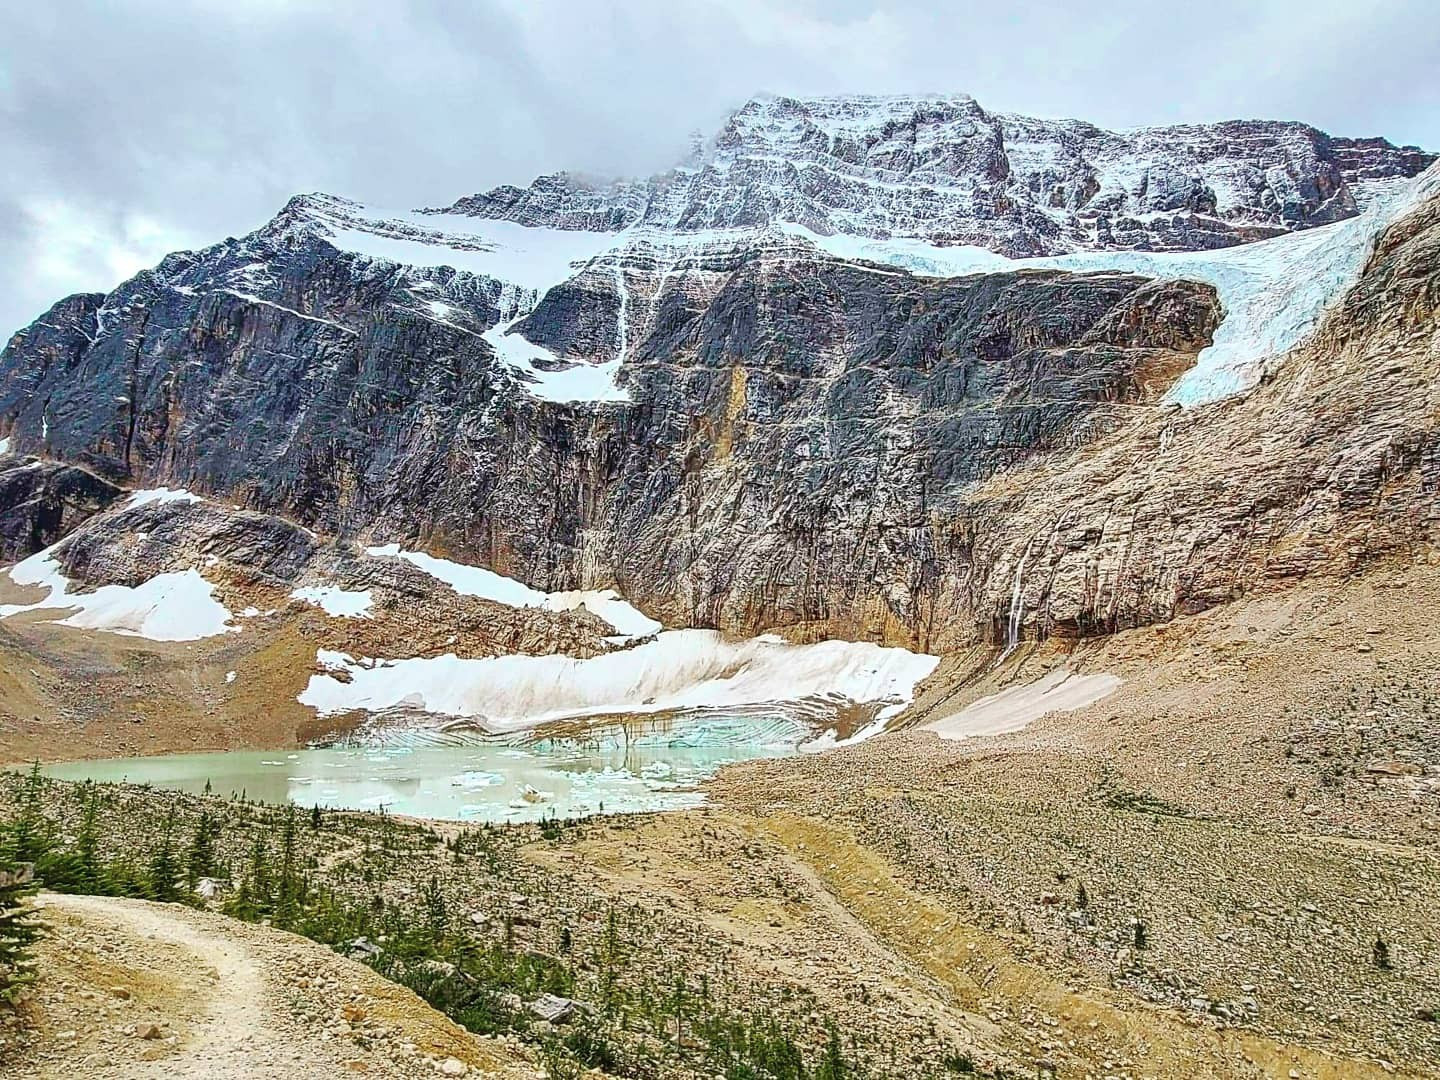
DOGS ARE NOT PERMITTED ON THE EDITH CAVELL MEADOWS TRAIL, BUT ARE ALLOWED ON PATH OF THE GLACIER TRAIL THAT LEADS TO A VIEWING DECK WHERE YOU CAN SEE KETTLE LAKE WHICH IS FORMED BY THE CAVELL GLACIER ABOVE THE POND.
From the traffic light at the junction of Highway 16 and Highway 93, follow Hwy 93 south for roughly 6.8 km to the junction with Highway 93A and go right. Follow the road for just over 5km before turning right onto the Mount Edith Cavell Road. This road features multiple switchbacks and I suggest following to posted speed limit as roads are narrow, be careful about wildlife crossing the road. In the summer of 2021, I encountered a Black Bear cub, 3 deer, an adult Black Bear going up to this trailhead and a Grizzly Bear on the return drive down the mountain. This is a breathtaking drive that crosses multiple little creeks and offers amazing views. It's roughly 14km to the parking area for this hike.
From the parking lot, follow the trail on the northeast side of the valley to a junction on the trail near a boulder moraine. If you continue on this trail west you will reach a viewing area where you can photograph Kettle Lake and Cavell Glacier (I highly recommend doing this first). But at the junction if you turn left (north), take the switchback through the subalpine forest to the meadows on the Cavell Meadows trail. Be bear aware as Grizzly Bears are known to frequent areas along this hike.
Distance: 6.4km (return)
Elevation Gain: 428m
From the top of the gondola this is an easy trail to find as it ids the only trail that goes up to Whistlers Peak. You can view the trail to Indian Ridge from the top of Whistlers. Head down towards the left-hand side of the ridge where a trail is easily seen. Soon after the ascent becomes very steep and to add to the elevation you are also now faced withy a scree slope. From here there are 5 elevated areas, with the 5th being Indian Summit, like I was told prior to doing this, if you need to use your hands you have gone too far. This section can be extremely dangerous due to loose rock and should not be attempted by people who don’t have the knowledge or equipment to make the fifth hump. Remember if it has rained reticently, please do not attempt this hike.
Distance: 9.86km (return)
Elevation Gain: 393m
High clearance vehicles recommended. No trailers or RV's.
To access this beautiful area, follow Highway 93 to Athabasca Falls. Travel north on Hwy 93a for 1.1 km to the Geraldine Fire Road. The trailhead is located 6 km up this gravel road
First Geraldine Lake
Moderate; 3.6 km return; Elevation gain/loss: 200 m;
1-2 hours;
Trailhead: Geraldine Lakes parking lot.
Sandwiched between the steep slopes of Mount Fryatt and Whirlpool Peak, First Geraldine Lake is a scenic lake set amongst the spruce forest.
Second Geraldine Lake
Difficult; 12.4 km return; elevation gain/loss: 608 m;
5-6 hours
Trailhead: Geraldine Lakes parking lot.
Beyond First Geraldine Lake, the trail becomes difficult, crossing boulder fields and ascending steep slopes. Your efforts are rewarded by the scenic waterfalls along the way. Note: Boulders are very slippery after rain or snowfall.
The information ABOVE for Geraldine Lakes is from the Parks Canada Website at https://www.pc.gc.ca/en/pn-np/ab/jasper/activ/activ-experience/sentiers-trails/geraldine
GO BEYOND – THE TRAIL CONTINUES PAST A FEW MORE LAKES BUT ARE NOT CONSIDERED BY THE PARK AS PART OF THE TRAIL. I HAVE INCLUDED THE GERALDINE EXTENDED TRAIL PROFILE BELOW AS WELL AS ON THE MAP I HAVE FOR THE JASPER NATIONAL PARK AREA. THE TOTAL LENGTH FROM THE PARKING LOT TO THE END OF THE EXTENDED TRAIL AND BACK IS 27.03KM RETURN WITH AN ELEVATION GAIN OF 1038M. THIS TRAIL REQUIRES ROUTE FINDING BUT YOU CAN USE MY TRAIL IN YOUR GPS. THE MOUNT FRYATT WEST FACE BACKCOUNTRY BIV SITE SITS NEAR A LAKE TO BREAK UP THIS EXTENDED HIKE. THIS EXTENDED TRAIL IF FOR ADVANCED HIKERS WITH SCRAMBLING AND ROUTE FINDING EXPERIENCE.
Distance: 12.03km (return)
Elevation Gain: 406m
A beautiful hike past multiple creeks and streams as well as passing 2 lakes – Beaver Lake (under 2km from the trailhead) and Summit Lake. From the northwest of Beaver Lake to the southeast of Summit Lake is 2.15km approximately, from here to Jacques Lake Backcountry Campground along a forested hike is roughly 7.34km which will put you on the northeast corner of Jacques Lake. Bear Poles are provided at the Jacques Lake Backcountry Campground along with 8 camping sites with firepits.
Distance: 24.04km (return)
Elevation Gain: 100m
To access Maligne Canyon turn onto the Maligne Lake Road off of Highway 16. Follow it for just over 2km and turn left into the Sixth Bridge along the Maligne River Road (I start you from there because honestly it’s the best place to start from especially early in the morning and watching the mist roll of the river). From the parking lot, cross the bridge over Maligne River and turn right to head toward Maligne Canyon, turning left here takes you on the Overlander Trail. Multiple springs which flow under limestone soon greet you and become more frequent as you follow the path upstream. The actual canyon starts to take shape around the 4th bridge, some great photos can be taken here. Relax during your time to the 3rd bridge as it is way more popular from then on till the end. When you reach the 1st Bridge, a really nice waterfall also greets you here and offers amazing views. From here you can continue on to the Maligne Canyon Wilderness Kitchen and Giftshop. Return the same way you came.
Distance: 8.65km (return)
Elevation Gain: 130m
Follow the Maligne Lake Road to Maligne Lake. After parking your vehicle head on down towards Maligne Lake, walk by a multitude of interpretive panels that act as a guide. This trail heads through pine and subalpine fur as it makes its way along the shores of Maligne Lake before looping back to the parking lot. This is a great introductory walk in Jasper, popular with bird watchers.
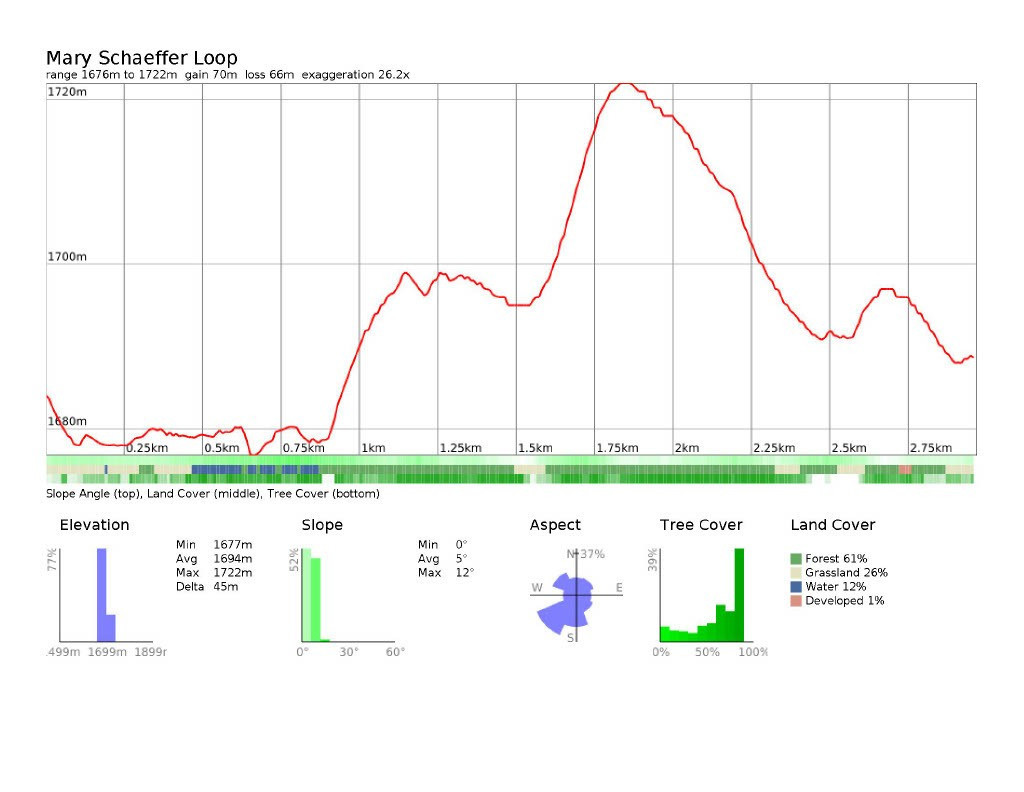
Distance: 2.97km (return)
Elevation Gain: 45m
The trailhead is located in the Jasper Activity Centre’s parking lot and features 3 beautiful lakes. Both upper and lower Mina Lakes are well known as a place where Loons and Ducks are commonly found.
Distance: 7.62m (return)
Elevation Gain: 115m
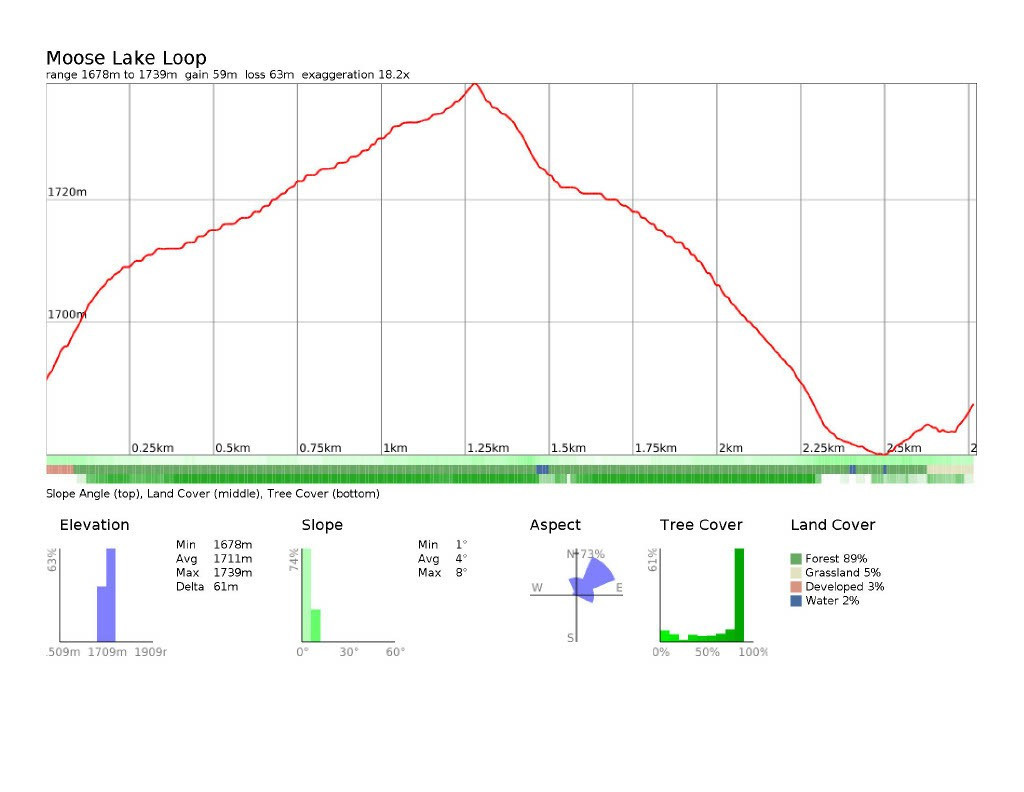
This trail begins on the Bald Hills Trail and then turns onto the Maligne pass trail as you make your way towards Moose Lake. I love this short little hike – from the drive along Maligne Lake Road to the trail itself where I have seen both Moose and Deer on multiple occasions. This forested hike features little hills, boulders and a beautiful lake which lies in a hollow in the rockslide debris caused by around half a billion cubic meters of rock that fell from a ridge on the ridge on the other side of Maligne Lake, blocking the valley and enlarging the lake to its current size according to Parks Canada. I have encountered Moose here on multiple occasions so yes there are Moose at Moose Lake.
Distance: 2.77km (return)
Elevation Gain: 61m
This relatively easy hike begins off of Highway 16 approximately 15 km northeast of the town of Jasper. The trail is quite well marked and an easy summit to add to your list. This hike offers some great views of the surrounding area and should not be overlooked. Definitely a few scrambling sections but a great way to get your legs ready for the upcoming hiking season.
Distance: 5.77km (return)
Elevation Gain: 607m
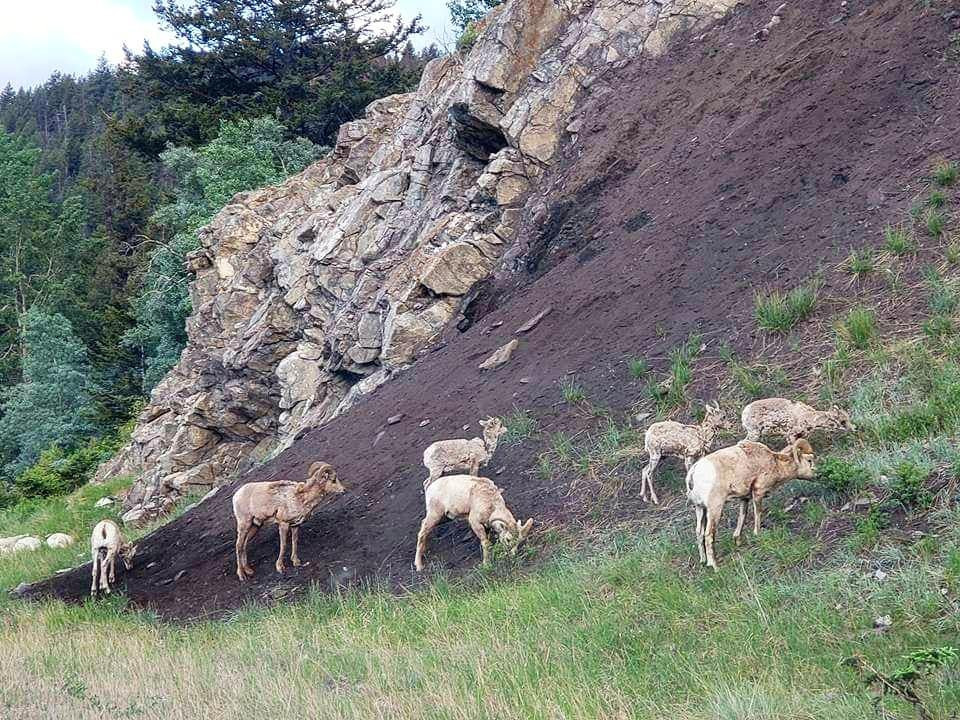
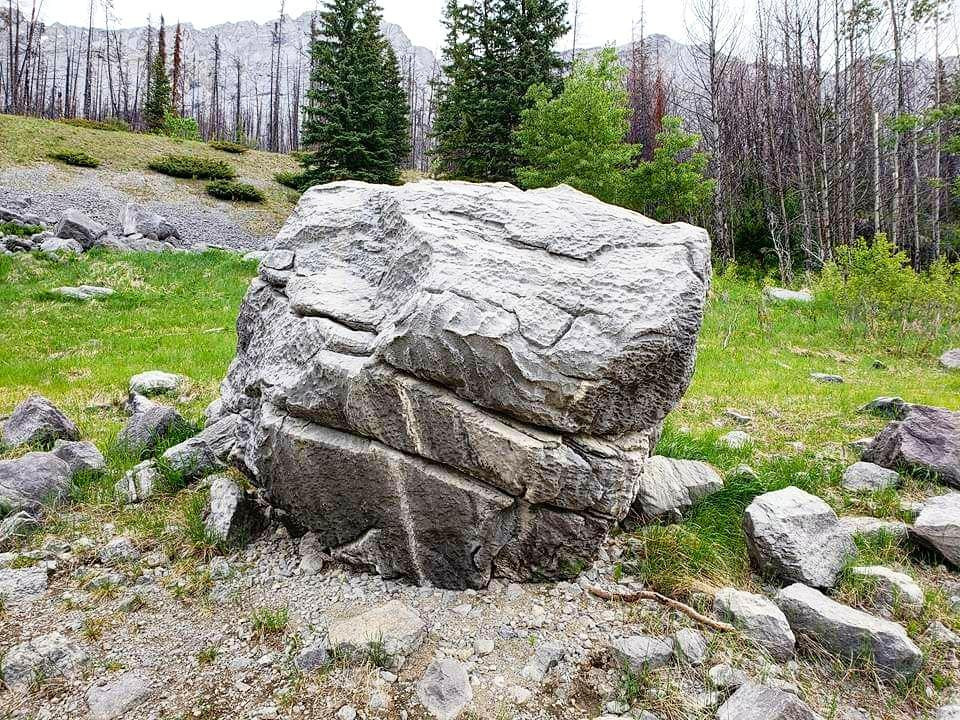
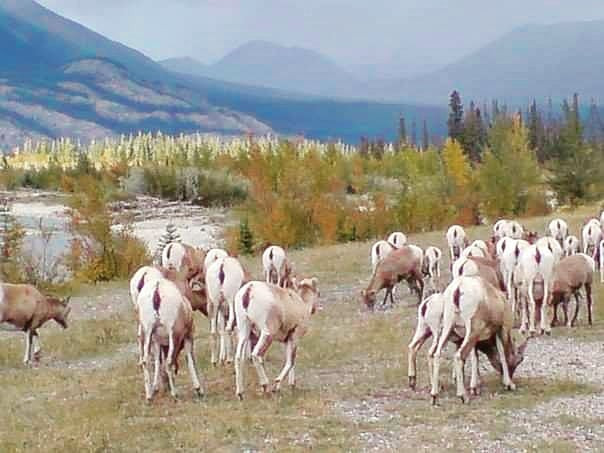
From Highway 16 turn off and follow Highway 93A to the Old Fort Pont/Lac Beauvert access road. Turn left and cross the Athabasca River and park in the lot on the right. Old Fort Point is a bedrock knob shaped by glaciers. Make sure to carry bear spray as Grizzly Bears are known to frequent the valley and I have personally seen Bighorn Sheep on the top of Old Fort Point.
The information below about this trail is from https://www.pc.gc.ca/en/pn-np/ab/jasper/activ/activ-experience/sentiers-trails/riviere-river. I included this because I found it really interesting the first time I read about it and thought you would enjoy it as well.
At 1.3 km you climb a very steep section 30 m of elevation gain in a short distance beside an outcrop of the oldest rock in Jasper National Park. The layer is Precambrian, about 750 million years old. Take a close look at this unusual rock. It's breccia, made of angular chunks of pink limestone.
Here's what you can see from the top of Old Fort Point on a good day, viewing clockwise: Mt. Edith Cavell (always snow-streaked) to the south, The Whistlers (mountain with the tramway terminal near the top) to the southwest, the valley of the Miette River leading west toward Yellowhead Pass and B.C., the town of Jasper across the Athabasca River, the reddish quartzite of the Victoria Cross Range to the northwest beyond the town (the peak with a microwave relay station on top is Pyramid Mountain), Lac Beauvert and Jasper Park Lodge to the north (other lakes visible northward: Annette and Edith), the gray limestone of the Colin Range to the northeast, rounded Signal Mountain and the cliffs of Mt. Tekarra to the east, and to the southeast, Mt. Hardisty (sloping layers) and Mt. Kerkeslin (layers bowed gently down) and much more.
Distance: 3.86km (return)
Elevation Gain: 123m
Turn off Highway 16 towards Maligne Lake Road and follow it to the lake. Park in the 1st parking lot on the left. This trail is considered by most who have completed it as one of the most beautiful hikes in Jasper National Park. The trailhead is easily seen on a signpost at the l of the parking lot. The beginning of this trail is relatively easy before you go through a steep section. Shortly after this you come to a junction at roughly 1.6km. I recommend going left here but if you have problems with your knees or legs go right, it is a steeper ascent but quicker. Once you reach the top the views of Maligne Lake are amazing. This hike offers great panoramic views. Grizzly Bears are known to frequent this area so be bear aware and have your bear spray in an easily accessible area.
Distance: 8.02km (return)
Elevation Gain: 472m
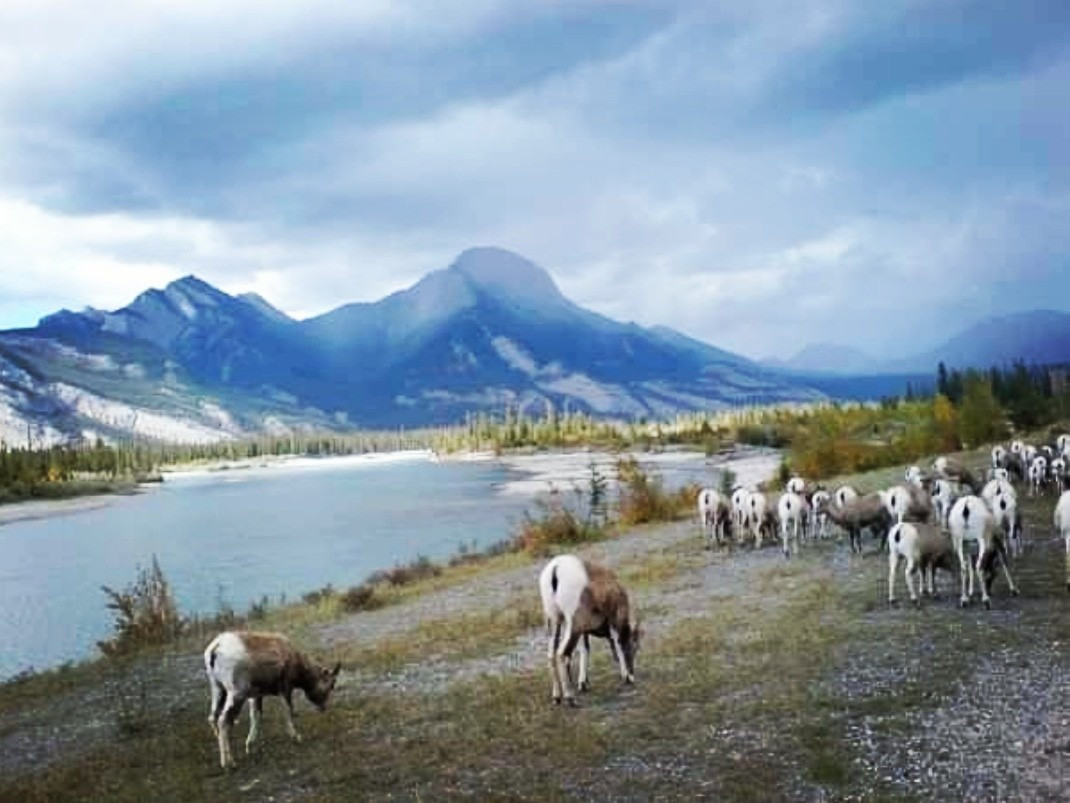
To access this hike, turn onto the Maligne Lake Road off of Highway 16. Follow it for just over 2km and turn left into the Sixth Bridge along the Maligne River Road, park in the parking lot. From here cross the bridge and turn left onto the Overlander Trail. This hike follows the Maligne River as it heads towards the Athabasca River. This hike starts by passing through a marshy area before becoming forested and leading towards Garonne Creek. As you come near Morro Creek and continue North you may view multiple game trails as both Bighorn Sheep and Grizzly Bears are known to frequent this area. Grizzly Bears have been seen at different points along the Overlander Trail. Be bear aware. I suggest using 2 vehicles and parking one beside the Cold Sulphur Springs near where this trail ends.
Distance: 15.19km (one-way)
Elevation Gain: 88m
A relatively easy hike along Patricia Lake. Be Bear Aware here as Bears are known to frequent this area.
Distance: 3.27km (return)
Elevation Gain: 61m
This hike goes around some unique wetlands and is a great viewing area for birds, Moose, Beaver as well as Bears are known to frequent this area during Berry Season, there are multiple different trails you can take to accomplish this hike, I prefer the one you can view on my map as it is the most scenic trail.
Distance: 5.88km (return)
Elevation Gain: 76m
Accessed from Pyramid Lake Road which you follow to the lake. A wooden boardwalk takes you to the island where kayakers can sometimes be seen paddling around this beautiful lake. Make sure to visit this place early as it gets super busy during the day here and there are limited benches available on the island.
Distance: 819m (return)
Elevation Gain: 7m
An exceptionally beautiful backpacking route: the highest trail in Jasper National Park.
Distance: 48.01km (return)
Elevation Gain: 1352m
Distance: 120.12km (return)
Elevation Gain: 911m
Located 44.3km east of the lights at the west end of Jasper’ Turn onto the Miette Hot Springs Road, and follow it for about 17 km to the Miette Hot Springs parking area. Follow this trail as it ascends east towards a junction at Shuey Pass, from here turn right (south) and heads towards the Sulphur Ridge. The trail ascends quite rapidly from here as you make your way to the top of the Sulphur Skyline. This hike offers some amazing rewards that your legs do need to work for but are definitely worth it.
Distance: 7.23km (return)
Elevation Gain: 611m
Distance: 43.4km (requires 2 vehicles)
Elevation Gain: 688m
This trail is accessed roughly 9km south of the traffic lights at the turnoff to Highway 93. By far I consider this one of the nicest hikes in Jasper National Park with the 3rd and 4th lakes being the true gem of this hike. Also the red chairs that celebrated Canada’s 150th birthday in 2017 are located. This is a very popular trail but it is also in Grizzly Bear country so be bear aware.
Distance: 8.57km (return)
Elevation Gain: 55m
Dogs are not allowed on this trail. Follow Highway 93 south from the town of Jasper for around 12km, then turn right on Highway 93A and follow it to the very narrow Mount Cavell Road. Turn right here and follow it to the Edith Cavell Hostel and park across from it at the Tonquin Valley Trailhead. From the parking lot head down to the bridge over Cavell Creek with an impressive view of Cavell Lake with Mount Edith Cavell (3363m) providing an impressive backdrop for the lake. At about 4.5km from the trailhead take the path to your left which leads to Verdant Pass. If you reach a bridge you have gone to far, turn around and head back to the trail to Verdant Pass. Some route-finding may be required here until you leave the forest behind and arrive at an alpine meadow, while most stop here, if you have good route-finding skills you can continue on to Verdant Pass.
Distance: 21.01km (return)
Elevation Gain: 589m
The trailhead is located roughly 14.5km south of Jasper on Highway 93. This lake was created by beavers and their huge dam is visible at the northeast corner of the lake. This is an easy hike that can be enjoyed by the whole family but be sure to carry Bear Spray on this hike.
Distance: 6.56km (return)
Elevation Gain: 61m
To access this trail, head south on Highway 93 from the town of Jasper, after passing the park gates turn onto Wabassa Road. Drive roughly 15km until you see the road for Moab Lake. Turn right onto this road and drive to the end, roughly 7km to the parking lot. While most people only go as far as Simon Creek, I have this trail listed a lot longer but that means that if you go by Simons Creek, route-finding skills become a necessity. To get to the Whirlpool Campsite is a relatively easy well signed trail and even if you choose not to go the full distance, I highly recommend staying a night here.
Distance: 40.12km (return)
Elevation Gain: 148m
To get here turn onto Maligne Lake Road off of Highway 16 within the boundaries of the National Park, follow Maligne Lake Road to the end and turn left into the parking lot (check my map prior to going to see where to go once you park). Head southwest from the parking lot and you will see the trailhead, which is located next to a fire road which continues almost all the way up. After a few kms you will arrive at a junction in the trail:
I recommend going right here and returning on the other route. These two trails join up above the treeline in an alpine meadow. Go straight here up to Bald Hill(2322m), (it can get quite windy up here so a Gortex Windproof coat is recommended) The views of Maligne Lake here are incredible and you definitely want your camera if you chose to do this hike. You can end your hike here or as many do continue on depending on time. View my map and if you are feeling adventurous, I recommend following the trail out to this peak south of Bald Hill as the views are definitely worth it.
The Saturday Night Lake Loop is a forested trail with many small lakes; it offers wonderful opportunities for spotting wildflowers and birds. The trail can be hiked or biked. You can expect muddy sections throughout the summer. No matter which direction you hike/bike, this trail starts at Cabin Creek and climbs steadily. The trail going up to Saturday Night Lake is steeper, while the trail up to Minnow Lake is still all uphill, but the grade is more gradual. Many hikers prefer going clockwise for a more gradual incline, while bikers go counterclockwise for a longer downhill section. That being said, this is a multi-use trail; be sure to make lots of noise to let other users and wildlife know you are on the trail. Both Minnow Lake and Saturday Night Lake campgrounds provide nice views and are situated right on the shores of small lakes. The trail between Minnow and Saturday Night lakes is typically muddy, but still makes for a nice valley hike.
What you need to know
The trail can be quite muddy, especially the section between Minnow and Saturday Night lakes. For bikers, this section is also rocky, rooty and steep in places. The campgrounds can have a lot of mosquitoes in summer.
Special considerations
The Saturday Night Lake Loop, also known as the 20 Mile Loop, is a multiuse trail. Be courteous to all users. Horse users travel back and forth from Saturday Night Lake; bikers should dismount and stand to the side of the trail if they encounter a horse party.
Suggested Itineraries
Two-Day Options
Three-Day Options
Hike 9.2 km to Minnow Lake and spend the night. The following day, hike 8.8 km to Saturday Night Lake and spend a second night. The following day, hike 6.6 km to the trailhead.
Trail distances (in km)
Elevation profile
Maps, GPS data and elevations are provided for reference purposes only. Maps are not meant for navigation. Parks Canada Agency (PCA) makes no guarantees, representations or warranties respecting these data, either expressed or implied. PCA assumes no responsibility for damages or other liabilities due to the accuracy, availability, use or misuse of the information herein provided.
Campgrounds Information
Safety in the Backcountry
You are responsible for your own safety. Be prepared for extreme weather and mountainous terrain. Cell phone coverage is unavailable in most areas.
Trail Report
Before leaving, check the Jasper National Park trail report for up-to-date conditions at www.pc.gc.ca/JasperTrails.
Trail Information
780-852-6177
pc.gc.ca/JasperBackcountry
Reservations
1-877-737-3783
pc.gc.ca/BookJasperBackcountry
Emergency
call 780-852-3100 or 877-852-3100
Maps
NTS: Jasper 83 D/16
Gemtrek: Best of Jasper
National Geographic: Jasper South
Leave no Trace
Food storage
To reduce your campsite’s attractiveness to bears, all food, garbage, toiletries and cooking equipment must be hung from the food storage cables provided at designated campsites. The campground is equipped with a bear pole for food storage. There are picnic tables on site.
Human waste
Use the pit toilet provided. When there are no facilities nearby, select a spot away from trails, campsites and at least 70 m from water sources. Dig a hole 12 to 16 cm into the dark-coloured, biologically active soil layer. Loosely fill the hole with soil afterward. Use as little toilet paper as possible. There is a pit toilet at all campgrounds.
Garbage
Please—Pack it in and pack it out! You are responsible for everything you take into the backcountry and this includes garbage. Do not dispose of garbage in pit toilets—it may attract animals.
Washing
To wash yourself or your dishes, carry water 70 m away from streams or lakes and use small amounts of biodegradable soap. Strain out those last bits of food waste and pack them out. Disperse strained water on land.
Camping
Please camp only at the campsites indicated on your Backcountry Camping Permit and use the tent pads (where provided).
Campfires
If fires are allowed, use the metal fireboxes provided, keep your fire small and use only deadfall. Tend to your fire at all times and extinguish it completely before you move on. Gas stoves are cleaner and more efficient for cooking. We recommend you use one.
Shortcutting trails
Shortcutting between trail switchbacks damages both the soil and plant life. This not only ruins the look of an area, but makes it susceptible to further damage by erosion.
Collecting natural or cultural objects
Rocks, fossils, horns, antlers, wildflowers, nests and all other natural or historical objects in a national park are protected by law. Leave them as you found them for others to enjoy.
For more information on low impact travel in the backcountry contact: leavenotrace.ca
1-877-238-9343
Backcountry Equipment Checklist
Have you got it?
This is a list of suggested equipment for Jasper's backcountry trails.
Mountain weather is unpredictable; be prepared for winter conditions at any time of the year. Snow may persist in high mountain regions into the summer and avalanche danger may occur in any season. This equipment list does not account for the special knowledge and equipment required to travel in avalanche terrain.
The Details
With almost 25 km of this trail hiked above treeline, the Skyline is Jasper’s highest and possibly most scenic trail. The high elevation allows for amazing views that extend over much of the park, encompassing vast meadows, windswept ridges and the chance to spot wildlife in the distance. Crossing three mountain passes, the Skyline trail offers a variety of flora, fauna and scenery unique to Jasper National Park. Be prepared for all weather conditions, and always check current conditions before setting off. Snow can fall any time of the year, and the section of trail called “the Notch” can be impassable early in the season.
What you need to know
The Skyline trail is Jasper’s most popular backcountry hiking trail, so we recommend booking in advance. This trail can only be hiked in the summer months, typically typically early July to early October.
Special considerations
The Skyline Trail has an escape route which can be used during poor weather or if the Notch is impassable. The Wabasso Trail is a long, rough 15-km trail with a steep descent of 1100 m, which starts at the Curator campground and ends on the Icefields Parkway, 14 km south of Jasper. There is cell reception at the Wabasso trailhead. Do not use the Watchtower trail as an escape route.
Be prepared for all weather conditions when hiking the Skyline trail, as sudden weather changes can occur.
The skyline trail has one outfitter lodge:
Suggested itineraries
The recommended direction to hike the Skyline is from south (Maligne Lake) to north. Most hikers walk the Skyline trail in 2-3 days, although one can spend an extra day to explore the alpine areas along the way. Hikers need to consider weather conditions and high altitudes when planning their length of stay.
Option one: 2 days
Start at Maligne Lake and hike 20 km to Curator campground. The following day, hike the 24 km out to the north trailhead on Maligne Lake Road.
Option two: 3 days
Start at Maligne Lake and hike 12 km to Snowbowl campground. The following day hike 18 km to Tekarra campground. The third day will be a 14-km hike out.
Trail Distances (in km)
Directions to trailhead
Maligne Trailhead (south)
Take Highway 16 East towards Edmonton. Two km from Jasper, turn right across the bridge onto Maligne Road. Continue for 46 km south on the Maligne Road to Maligne Lake. Continue on the road past the chalet and across the bridge to the parking lot on the west side of the lake. The trailhead is on the right-hand side of the road, just before you reach the parking lot.
Signal Trailhead (north)
Drive 8 km south on the Maligne Lake Road. Parking area is on the right.
Safety in the Backcountry
You are responsible for your own safety. Be prepared for extreme weather and mountainous terrain. Cell phone coverage is unavailable in most areas.
Trail report
Before leaving, check the Jasper National Park trail report for up-to-date conditions at www.pc.gc.ca/jaspertrails
Trail offices
Trail Information, 780-852-6177
General information
Jasper Information Centre, 780-852-6176
www.pc.gc.ca/jasper
EMERGENCY: call 780-852-3100
877-852-3100
Carry a topo map
NTS
Medicine Lake 83C/13
Athabasca Falls 83C/12
Gemtrek
Jasper and Maligne Lake
National Geographic
Jasper South.
Leave no Trace
Food Storage
To reduce your campsite’s attractiveness to bears, all food, garbage, toiletries and cooking equipment must be hung from the food storage cables provided at designated campsites. In wildland camping areas, bear-resistant containers are strongly recommended to store food. All campgrounds are equipped with a bear pole for food storage. There are picnic tables present.
Human Waste
There are barrel toilets at all campgrounds. When there are no facilities nearby, select a spot away from trails, campsites and at least 70 m from water sources. Dig a hole 12 to 16 cm into the dark-coloured, biologically active soil layer. Loosely fill the hole with soil afterward. Use as little toilet paper as possible.
Garbage
Please—Pack it in and pack it out! You are responsible for everything you take into the backcountry and this includes garbage. Do not dispose of garbage in pit toilets—it may attract animals.
Washing
To wash yourself or your dishes, carry water 70 m away from streams or lakes and use small amounts of biodegradable soap. Strain out those last bits of food waste and pack them out. Disperse strained water on land.
Camping
Please camp only at the campsites indicated on your Backcountry Camping Permit and use the tent pads (where provided).
Campfires
If fires are allowed, use the metal fireboxes provided, keep your fire small and use only deadfall. Tend to your fire at all times and extinguish it completely before you move on. Gas stoves are cleaner and more efficient for cooking. We recommend you use one.
Shortcutting trails
Shortcutting between trail switchbacks damages both the soil and plant life. This not only ruins the look of an area, but makes it susceptible to further damage by erosion.
Collecting natural or cultural objects
Rocks, fossils, horns, antlers, wildflowers, nests and all other natural or historical objects in a national park are protected by law. Leave them as you found them for others to enjoy.
For more information on low impact travel in the backcountry contact: leavenotrace.ca
1-877-238-9343
Backcountry equipment checklist
Have you got it?
This is a list of suggested equipment for Jasper's backcountry trails.
Mountain weather is unpredictable; be prepared for winter conditions at any time of the year. Snow may persist in high mountain regions into the summer and avalanche danger may occur in any season. This equipment list does not account for the special knowledge and equipment required to travel in avalanche terrain.
| Campground | Description | # of Sites | Fire Pit | UTM |
| Evelyn Creek (Elevation: 1824m) | A small, quiet campground by a creek, good for hikers getting a late start in the day. | 4 | No Fire Pits | 11U 452481-5843006 |
| Little Shovel (Elevation: 2233m) | A campground with beautiful views over Maligne Lake and the Bald Hills, situated below Little Shovel Pass. This campground is great for campers who want to avoid the busier Snowbowl campground. | 8 | No Fire Pits | 11U 450097-5843025 |
| Snowbowl (Elevation: 2094m) | Popular campground located in a spectacular meadow, sheltered by trees, with easy access to water. | 8 | No Fire Pits | 11U 447313-5844782 |
| Curator (Elevation: 2070m) | Popular campground located in a spectacular meadow, sheltered by trees, with easy access to water. | 8 | No Fire Pits | 11U 442215-5849105 |
| Tekarra (Elevation: 2062m) | A beautiful campground with great views, located next to a fast moving creek. | 8 | No Fire Pits | 11U 437992-5855673 |
| Signal (Elevation: 2014m) | A quiet campground at the top of the Signal fire road. There are great views over Jasper and surroundings from the hills above the campground. | 4 | No Fire Pits | 11U 434058-5858562 |
| Clothing | Shelter | Other Essentials | Optional |
| Long underwear Wool sweater, down vest, or fleece jacket Raingear - pants and jacket, gaiters Hat and gloves /mittens Boots with ankle support and good soles Sandals or runners for fording streams and at camp Life jacket Extra warm clothes in waterproof bag |
Tent with waterproof fly Food should include enough for an extra day Water filter, purification tablets or extra fuel for boiling your water Waterproof bag to store food at campgrounds |
Wilderness pass Bear spray and the knowledge to use it Topographic map Compass Waterproof matches &/or lighter Insect repellent Flashlight and extra batteries First Aid kit Signaling device (whistle or mirror) Toilet paper Rope - approx. 8m. A throw bag works well Waterproof bags for all gear |
Binoculars Altimeter Field guide(s) GPS SPOT™ Device or satellite phone, inReach device |
Backcountry camping permits
A backcountry camping permit is mandatory for all overnight trips and can be obtained online at reservations.pc.gc.ca or by calling 1877-737-3783.
The information provided above for the Saturday Night Lake Loop is from the Parks Canada Website at https://www.pc.gc.ca/en/pn-np/ab/jasper/activ/passez-stay/arrierepays-backcountry/sugg-sentiers_trip-ideas/SaturdayNight) as I found it gave a very good description of this trail and provided information to help people stay safe and enjoy this trip. Check my map I have for Jasper and view it as the names of the lakes etc. are more accurate and you can see the terrain etc. Thank you.
Campground Information
| Clothing | Shelter | Other Essentials | Optional |
| Long underwear Wool sweater, down vest, or fleece jacket Raingear - pants and jacket, gaiters Hat and gloves /mittens Boots with ankle support and good soles Sandals or runners for fording streams and at camp Life jacket Extra warm clothes in waterproof bag |
Tent with waterproof fly Food should include enough for an extra day Water filter, purification tablets or extra fuel for boiling your water Waterproof bag to store food at campgrounds |
Wilderness pass Bear spray and the knowledge to use it Topographic map Compass Waterproof matches &/or lighter Insect repellent Flashlight and extra batteries First Aid kit Signaling device (whistle or mirror) Toilet paper Rope - approx. 8m. A throw bag works well Waterproof bags for all gear |
Binoculars Altimeter Field guide(s) GPS SPOT™ Device or satellite phone, inReach device |
Backcountry camping permits
A backcountry camping permit is mandatory for all overnight trips and can be obtained online at reservations.pc.gc.ca or by calling 1-877-737-3783.
The information above for the Skyline Trail is from https://www.pc.gc.ca/en/pn-np/ab/jasper/activ/passez-stay/arrierepays-backcountry/sugg-sentiers_trip-ideas/Skyline due to the fact that it is such a long trail and I believe this description is the best one to keep potential hikers safe along this amazing trail.
Dogs are not allowed on this trail. Follow Highway 93 south from the town of Jasper for around 12km, then turn right on Highway 93A and follow it to the very narrow Mount Cavell Road. Turn right here and follow it to the Edith Cavell Hostel and park across from it at the Tonquin Valley Trailhead.
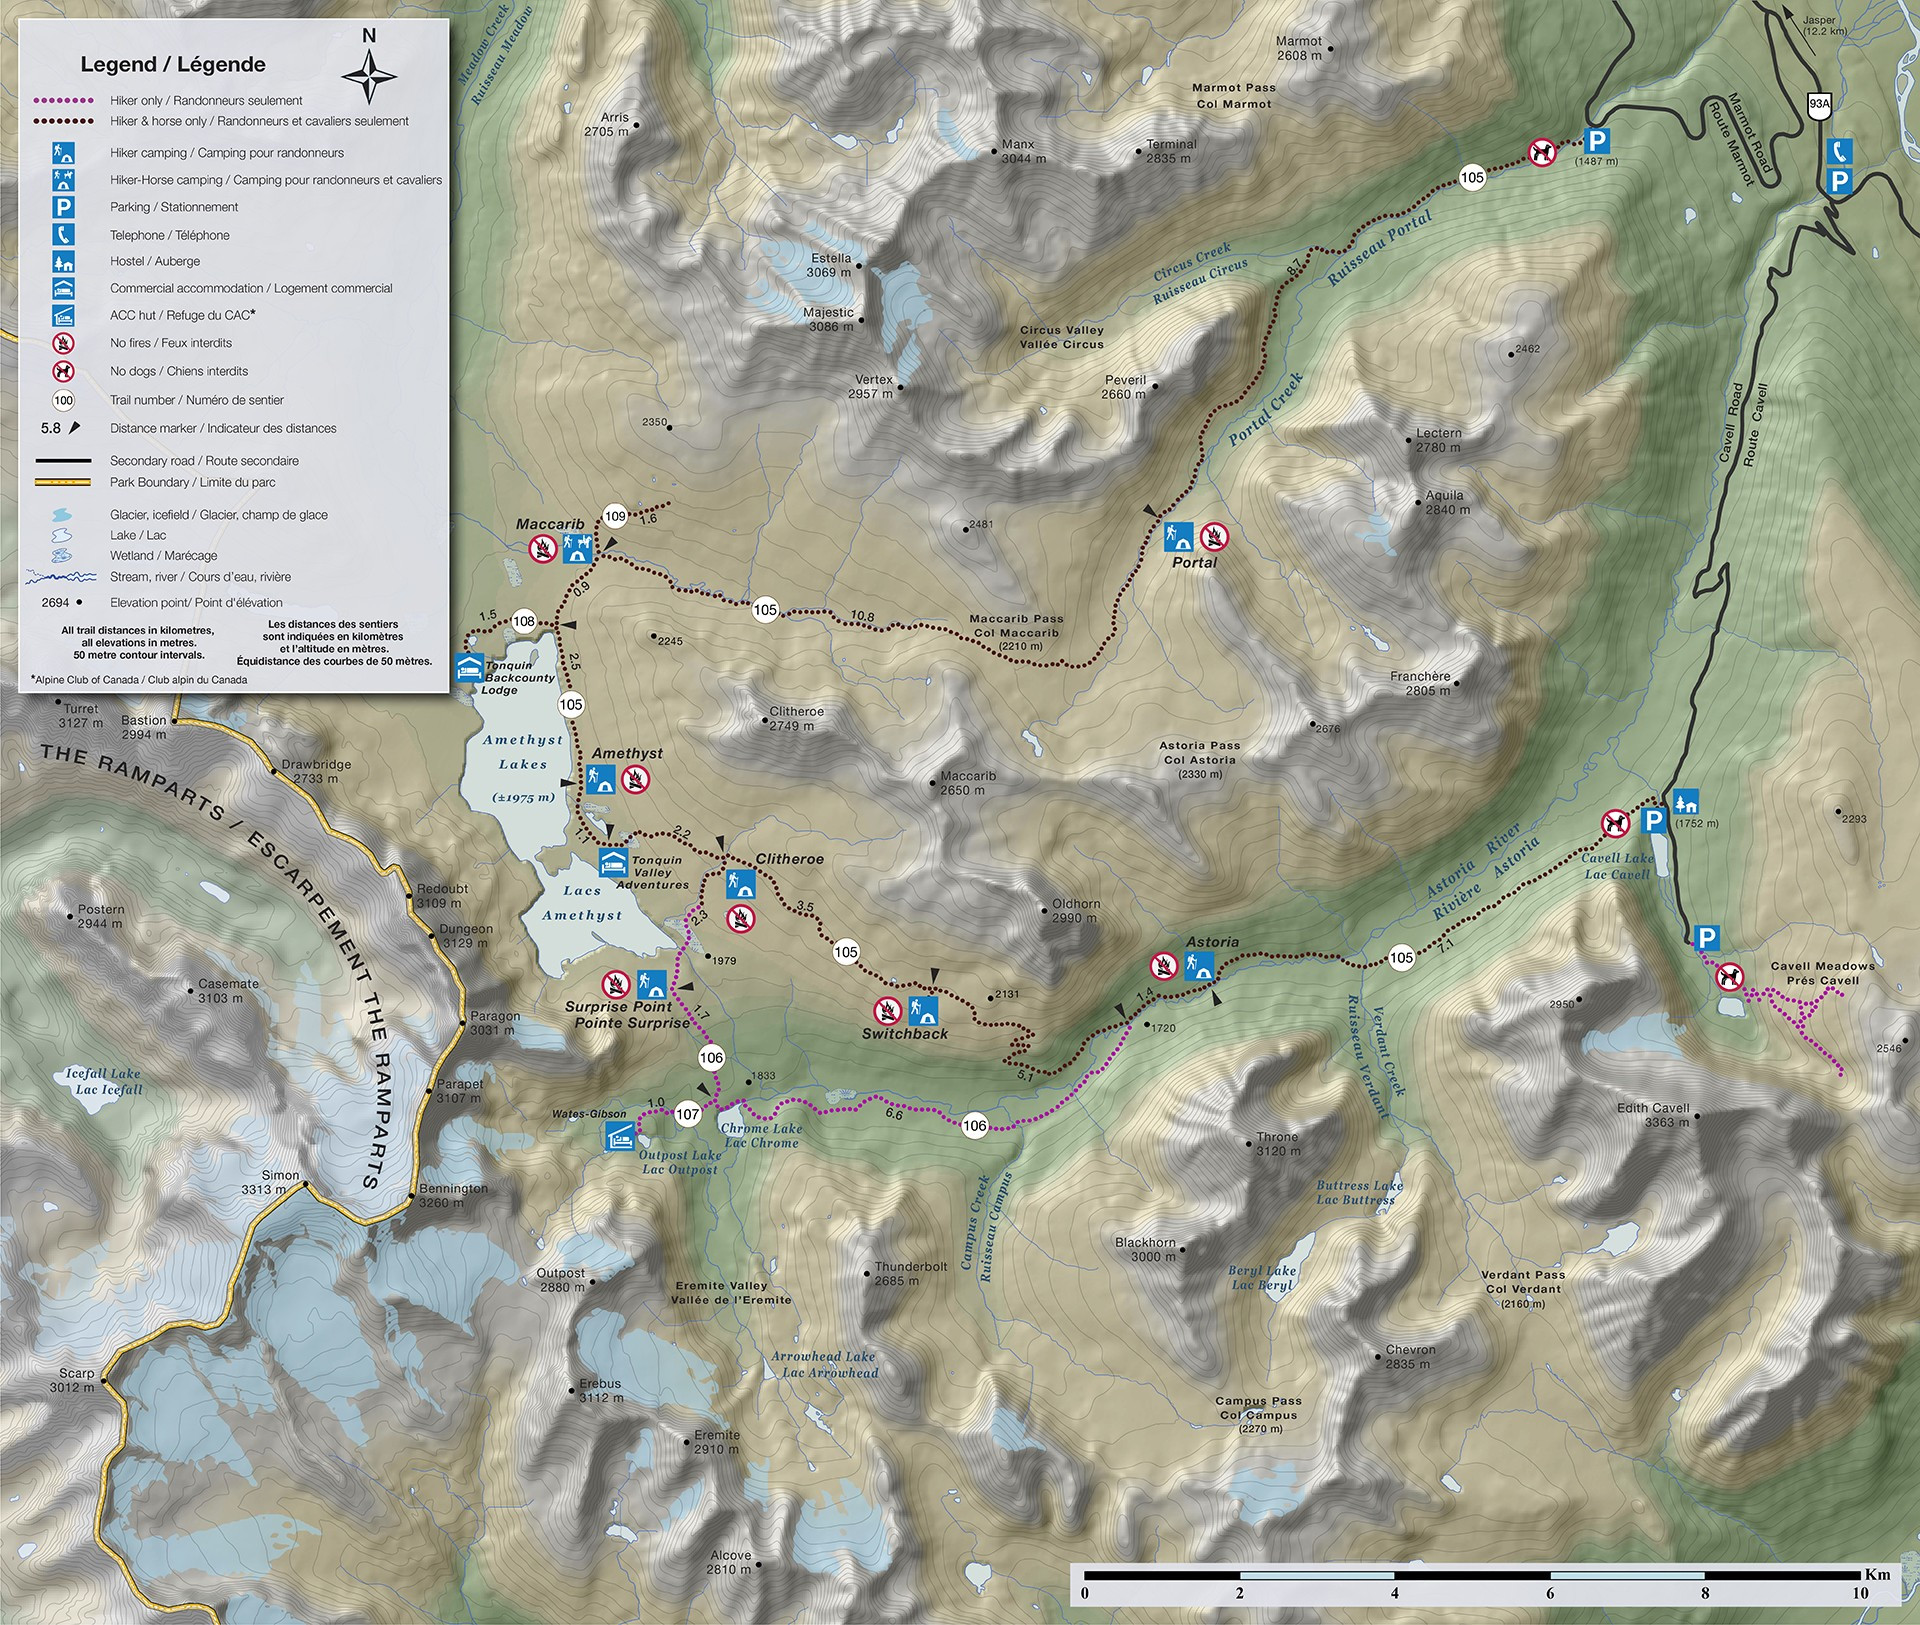
The information below for the Tonquin Valley Trail is is from https://www.pc.gc.ca/en/pn-np/ab/jasper/activ/passez-stay/arrierepays-backcountry/sugg-sentiers_trip-ideas/Tonquin
Click to download the map
The details
The Tonquin Valley’s scenery is unrivalled. The trail takes you into one of Canada’s premiere alpine regions, a unique combination of barren peaks, ghostly ice and fertile lakes. The valley is popular for its stunning views of Amethyst Lake at the base of the Ramparts Mountain Range. It’s famous for its variety of wildlife, which includes grizzlies, black bears, and mountain caribou. It does also have a reputation for its muddiness and an abundance of mosquitoes, so be prepared for a bit of everything. Maccarib Pass is a definite highlight and the day trips into the Eremite Valley and Moat Lake are
great for those with some extra time.
What you need to know
The Tonquin Valley Trail can be hiked in the summer months and skied in late winter. In the summer months the area tends to be quite muddy and the bugs can be bad. Late summer and fall are the best times to hike the Tonquin Valley. Like all backcountry trails, the Tonquin is frequented by wildlife, so be sure to keep a clean campsite and use the bear poles provided. If travelling in the winter months be sure to check avalanche conditions, pack all avalanche safety gear, and practice no trace camping. Be prepared for all weather conditions.
Special considerations
The Tonquin Valley has two outfitters lodges:
There is also an Alpine Club of Canada Hut (ACC) which is a great base for daytrips, or for mountaineers planning on climbing the Ramparts:
Trail distances (in km)
Campground Information
| Campground | Description | # of Sites | Fire Pit | UTM |
| Astoria (Elevation: 1690m) | This forested site sits on a ridge above the Astoria River. | 4 | No Fire Pits | 11U 422681-5837524 |
| Switchback (Elevation: 2233m) | A somewhat forested campground, which still has great views of the surrounding mountains. | 8 | No Fire Pits | 11U 418802-5837175 |
| Clitheroe (Elevation: 2080m) | This forested campground offers views of the Ramparts Mountain Range. It can be used as a base camp to explore the Eremite Valley. | 8 | No Fire Pits | 11U 416199-5838929 |
| Surprise Point (Elevation: 1978m) | Popular campground located in a spectacular meadow, sheltered by trees, with easy access to water. | 4 | No Fire Pits | 11U 415545-5837389 |
| Amethyst (Elevation: 1985m) | Located close to Amethyst Lake with spectacular views of the Ramparts Mountain Range, this is the most centrally located and most popular campground in the valley. | 8 | No Fire Pits | 11U 414457- 5840086 |
| Maccarib (Elevation: 2012m) | This campground is perched nicely at treeline with great views of the valley. | 4 | No Fire Pits | 11U 421730-5843293 |
Directions to Portal Creek Trailhead
Portal Creek on Marmot Road (16 km from Jasper). This trailhead is accessible year-round.
From Jasper
Take the Icefields Parkway towards Banff, and turn right immediately after the park gate, onto Highway 93A. Continue along 93A for 2.4 km, and turn right onto Marmot Road. The trailhead is on your left at km 12 of the road, marked by a hiker sign.
From Banff and Lake Louise
Follow the Icefields Parkway north towards Jasper. Turn left at the junction to highway 93A and Athabasca Falls, 200 km north of Lake Louise. Continue along 93A for 21.5 km, and turn left onto Marmot Road. The trailhead is on your left at km 12 of the road, marked by a hiker sign.
Directions to Astoria Creek Trailhead
Cavell Road (29 km from Jasper): In winter the Cavell Road stays closed until February 15 for caribou conservation. After February 15, the road is trackset for cross-country skiing. The road is typically open to vehicles from
mid-June to October 15.
From Jasper
Take the Icefields Parkway towards Banff, and turn right immediately after the park gate, onto highway 93A. Continue along 93A for 5.2 km, and turn right onto the Edith Cavell Road. The trailhead is across from Hostelling International’s (HI) Edith Cavell Hostel, at km 12 of the road.
From Banff and Lake Louise
Follow the Icefields Parkway north towards Jasper. Turn left at the junction to Highway 93A and Athabasca Falls, 200 km north of Lake Louise. Continue for 18.8 km, and turn left onto the Edith Cavell Road. The trailhead is across from Hostelling International’s (HI) Edith Cavell Hostel, at km 12 of the road.
Safety in the backcountry
You are responsible for your own safety. Be prepared for extreme weather and mountainous terrain. Cell phone coverage is unavailable in most areas.
Trail report
Before leaving, check the Jasper National Park trail report for up-to-date conditions at www.pc.gc.ca/jaspertrails.
Trail offices
Trail Information, 780-852-6177
General information
Jasper Information Centre, 780-852-6176
www.pc.gc.ca/jasper
EMERGENCY: call 780-852-3100
877-852-3100
Carry a topo map
NTS: Columbia Icefield 83D/16, Amethyst Lakes 83D/9
National Geographic: Jasper South
Leave no trace
Food storage
To reduce your campsite’s attractiveness to bears, all food, garbage, toiletries and cooking equipment must be hung from the food storage cables provided at designated campsites. In wildland camping areas, bear-resistant containers are strongly recommended to store food. The campground is equipped with a bear pole for food storage. There are picnic tables present.
Human waste
Use the toilet provided. When there are no facilities nearby, select a spot away from trails, campsites and at least 70 m from water sources. Dig a hole 12 to 16 cm into the dark-coloured, biologically active soil layer. Loosely fill the hole with soil afterward. Use as little toilet paper as possible. There is a pit toilet at all campgrounds.
Garbage
Please—Pack it in and pack it out! You are responsible for everything you take into the backcountry and this includes garbage. Do not dispose of garbage in pit toilets—it may attract animals.
Washing
To wash yourself or your dishes, carry water 70 m away from streams or lakes and use small amounts of biodegradable soap. Strain out those last bits of food waste and pack them out. Disperse strained water on land.
Camping
Please camp only at the campsites indicated on your Backcountry Camping Permit and use the tent pads (where provided).
Campfires
If fires are allowed, use the metal fireboxes provided, keep your fire small and use only deadfall. Tend to your fire at all times and extinguish it completely before you move on. Gas stoves are cleaner and more efficient for cooking. We recommend you use one.
Shortcutting trails
Shortcutting between trail switchbacks damages both the soil and plant life. This not only ruins the look of an area, but makes it susceptible to further damage by erosion.
Collecting natural or cultural objects
Rocks, fossils, horns, antlers, wildflowers, nests and all other natural or historical objects in a national park are protected by law. Leave them as you found them for others to enjoy.
For more information on low impact travel in the backcountry contact: leavenotrace.ca
1-877-238-9343
Backcountry equipment checklist
Have you got it?
This is a list of suggested equipment for Jasper's backcountry trails.
Mountain weather is unpredictable; be prepared for winter conditions at any time of the year. Snow may persist in high mountain regions into the summer and avalanche danger may occur in any season. This equipment list does not account for the special knowledge and equipment required to travel in avalanche terrain.
| Clothing | Shelter | Other Essentials | Optional |
| Long underwear Wool sweater, down vest, or fleece jacket Raingear - pants and jacket, gaiters Hat and gloves/ mittens Boots with ankle support and good soles Sandals or runners for fording streams and at camp Life jacket Extra warm clothes in waterproof bag |
Tent with waterproof fly Food should include enough for an extra day Water filter, purification tablets or extra fuel for boiling your water Waterproof bag to store food at campgrounds |
Wilderness pass Bear spray and the knowledge to use it Topographic map Compass Waterproof matches &/or lighter Insect repellent Flashlight and extra batteries First Aid kit Signaling device (whistle or mirror) Toilet paper Rope - approx. 8m. A throw bag works well Waterproof bags for all gear |
Binoculars Altimeter Field guide(s) GPS SPOT™ Device or satellite phone |
Backcountry camping permits
A backcountry camping permit is mandatory for all overnight trips and can be obtained online at reservations.pc.gc.ca or by calling 1877-737-3783.
| Trail | Distance | Elevation Gain | Terrain |
| Athabaska Falls Interpretive Trail | 1.79km (return) | 20m | Scramble/bushwhack along stream bed to a waterfall |
| Bald Hills Trail | 14.51km (return) | 676m | Steep easy hike |
| Dorothy and Christine Lake Trail | 8.31km (return) | 266m | Intermediate Hike with train tracks & bridges |
| Edith Cavell Meadows Trail | 6.4km (return) | 428m | A hike with multiple switchbacks |
| Geraldine Lakes Trai | 12.03km (return) | 406m | Difficult; 5-6 hours. |
| Indian Ridge via Whistlers Summit | 9.86km (return) | 393m | Difficult; Steep elevation & scree slopes |
| Jacques Lake Trail | 24.04km(return) | 100m | A beautiful hike past multiple creeks & streams. |
| Malign Canyon Trail | 8.65km (return) | 130m | Lovely hike with six bridges to cross over. |
| Mary Shaeffer Loop | 2.97km (return) | 45m | A steep hike into an area used for rock climbing |
| Mina Lake | 7.62km (return) | 115m | A beautiful hike leading up to 3 different lakes! |
| Moose Lake Loop | 2.77km (return) | 61m | A forested path with a small scramble section |
| Morro Peak Trail | 5.77km (return) | 607m | A relatively short hike with an easy summit to reach |
| Old Fort Point Loop | 3.86km (return) | 123m | Easy hike with active wildlife |
| Opal Hills Loop | 8.02km (return) | 472m | Known as one of the nicest hikes in Jasper |
| Overlander Trail | 15.19km (one-way) | 88m | A hike that follows Maligne River towards Athabasca River |
| Patricia Lake Trail | 3.27km (return) | 61m | An easy hike along Patricia Lake |
| Patricia Lake via Cottonwood Creek Trail | 5.88km (return) | 76m | Wetlands with presence of wildlife |
| Pyramid Island Trail | 819m (return) | 7m | Popular hotshopt for photographers & Kayakers |
| Saturday Night Lake Loop Hike | 23.8km (return) | 549m | A forested trail with many small lakes |
| Skyline Trail | 48.01km (one-way) | 1352m | The highest trail in Jasper National Park |
| South Boundary Trail | 120.12km (return) | 911m | View Profile |
| Sulphur Skyline Trail | 7.23km (return) | 611m | a fair uphill hike to amazing views |
| Tonquin Valley Trail | 43.4km (requires 2 vehicles) | 688m | Amazing hike filled with active wildlife, views & lakes |
| Valley of the 5 Lakes Trail | 8.57km (return) | 55m | An easy hike with 4 lake and active wildlife |
| Verdant Pass via Astoria River | 21.01km (return) | 589m | Difficult hike with necessary route finding skills |
| Parker Ridge Trail | 5.02km (one-way) | 248m | Forested trail, steep climb |
| Wabasoo Lake Trail | 6.56km (return) | 61m | Easy hike for the family |
| Whirlpool Valley Fire Trail | 40.12km (return) | 148m | A fairly long hike; Route finding skills necessary |
The information above for the South Boundary Trail is from https://www.pc.gc.ca/en/index due to the fact that it is such a long trail and I believe this description is the best one to keep potential hikers safe along this amazing trail.
The information below for the South Boundary Trail is from https://www.pc.gc.ca/en/index due to the fact that it is such a long trail and I believe this description is the best one to keep potential hikers safe along this amazing trail.
The maps, GPS data and elevations on profiles are provided for reference purposes only and to help you plan you next outdoor adventure. Maps can be used for navigation and you can open them up in Caltopo for a better viewing experience. Backcountry Views makes no guarantees, representations or warranties respecting this data, either expressed or implied. Backcountry Views assumes no responsibility for damages or other liabilities due to the accuracy, availability, use or misuse of the information provided. I use the information provided within this website to help plan my hikes from elevations to different types of terrain. This info is free to use, as I want to help everyone have a safe enjoyable time while hiking, thank you very much. I hope you find this info to be a benefit to you. For updates follow me at backcountryviewsofficial on Instagram.


